This post is the experiment log of using Contrail BGP as a Service to allow routing between external network and a container inside a docker host with Project Calico as the networking plugin.
Here is the simplified topology diagram
                     Internet
                         +                         +-------------+
                         |                         | vmx gateway |
                         +                         |             |
                     192.168.1.1                   +-------------+
                         +                                 |192.168.1.22
                         |                                 |
   +---+-----------------+--------------+------------------+---------------+------------------------------+
       |                                |                                  |
192.168.1.19                       192.168.1.18                     192.168.1.142
       |                                |                                  |
       |                                |                                  |
  +----+----+   +--------------------------------------------+        +----+-------+
  |Contrail |   |                       |                    |        |  Test PC   |
  |Control  |   |                     vrouter                |        |            |
  +---------+   |                       |                    |        +------------+
                |   net1                |   100.64.1.0/24    |
                | +-------+-------------+----------------+   |
                |         |                                  |
                |    100.64.1.18                             |
                |   +-----+------------------------------+   |
                |   |     |          100.64.100.0/24     |   |
                |   |   +-+----------------+--------+    |   |
                |   |                      |             |   |
                |   |         100.64.100.71|             |   |
                |   |  +--------------------------+      |   |
                |   |  |                          |      |   |
                |   |  |  container               |      |   |
                |   |  +--------------------------+      |   |
                |   | Docker host                        |   |
                |   +------------------------------------+   |
                | Compute node                               |
                +--------------------------------------------+
Test Setup
Openstack + Contrail
- It is assumed that
- we have a working Openstack system with Contrail as neutron plugin.
- there is at least one virtual network configured and reachable from outside
- routing between external network and Openstack VM is there, either via gateway router or via contrail simple gateway
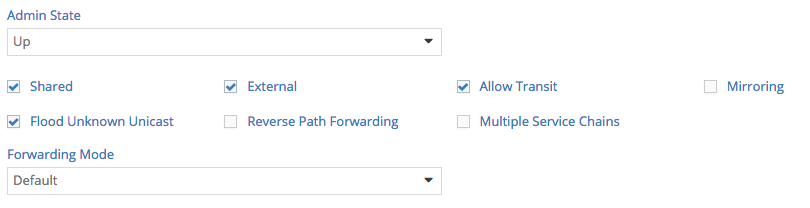
- To allow connectivity between external network and any subnet behind the VM, we need to enable “allow transit traffic” on the virtual network where the VM is connected to. In this example, the virtual network name is public
Docker VM
-
For simplicity, we will launch a Centos 7 VM and make it as a docker host. For further reference we will call this VM as Docker VM.
-
Install docker
[root@dockerhost ~]# yum install -y docker [root@dockerhost ~]# systemctl start docker [root@dockerhost ~]# systemctl enable docker -
Before we install Calico, we need to install Etcd first
[root@dockerhost ~]# yum -y install etcd [root@dockerhost ~]# systemctl start etcd [root@dockerhost ~]# systemctl enable etcd -
update docker systemd configuration to add cluster-store information
[root@dockerhost ~]# more /usr/lib/systemd/system/docker.service [Unit] Description=Docker Application Container Engine Documentation=http://docs.docker.com After=network.target Wants=docker-storage-setup.service Requires=docker-cleanup.timer [Service] Type=notify NotifyAccess=all KillMode=process EnvironmentFile=-/etc/sysconfig/docker EnvironmentFile=-/etc/sysconfig/docker-storage EnvironmentFile=-/etc/sysconfig/docker-network Environment=GOTRACEBACK=crash Environment=DOCKER_HTTP_HOST_COMPAT=1 Environment=PATH=/usr/libexec/docker:/usr/bin:/usr/sbin ExecStart=/usr/bin/dockerd-current \ --add-runtime docker-runc=/usr/libexec/docker/docker-runc-current \ --default-runtime=docker-runc \ --exec-opt native.cgroupdriver=systemd \ --userland-proxy-path=/usr/libexec/docker/docker-proxy-current \ --cluster-store=etcd://127.0.0.1:2379 \ -----------> add this $OPTIONS \ $DOCKER_STORAGE_OPTIONS \ $DOCKER_NETWORK_OPTIONS \ $ADD_REGISTRY \ $BLOCK_REGISTRY \ $INSECURE_REGISTRY ExecReload=/bin/kill -s HUP $MAINPID LimitNOFILE=1048576 LimitNPROC=1048576 LimitCORE=infinity TimeoutStartSec=0 Restart=on-abnormal MountFlags=slave [Install] WantedBy=multi-user.target -
To install calico on docker, we need to get the calicoctl utility first
[root@dockerhost ~]# wget -O /usr/local/bin/calicoctl https://github.com/projectcalico/calicoctl/releases/download/v1.3.0/calicoctl --2017-06-18 01:56:25-- https://github.com/projectcalico/calicoctl/releases/download/v1.3.0/calicoctl Resolving github.com (github.com)... 192.30.253.113 Connecting to github.com (github.com)|192.30.253.113|:443... connected. HTTP request sent, awaiting response... 302 Found Location: https://github-production-release-asset-2e65be.s3.amazonaws.com/29629333/b1225f80-4f6e-11e7-938f-c21adf6e9188?X-Amz-Algorithm=AWS4-HMAC-SHA256&X-Amz-Credential=AKIAIWNJYAX4CSVEH53A%2F20170618%2Fus-east-1%2Fs3%2Faws4_request&X-Amz-Date=20170618T015625Z&X-Amz-Expires=300&X-Amz-Signature=bee411598a2d57e89faf2ceb8e078eb4d57d1dedf7207eaa4f0d33a16ebf52ec&X-Amz-SignedHeaders=host&actor_id=0&response-content-disposition=attachment%3B%20filename%3Dcalicoctl&response-content-type=application%2Foctet-stream [following] --2017-06-18 01:56:25-- https://github-production-release-asset-2e65be.s3.amazonaws.com/29629333/b1225f80-4f6e-11e7-938f-c21adf6e9188?X-Amz-Algorithm=AWS4-HMAC-SHA256&X-Amz-Credential=AKIAIWNJYAX4CSVEH53A%2F20170618%2Fus-east-1%2Fs3%2Faws4_request&X-Amz-Date=20170618T015625Z&X-Amz-Expires=300&X-Amz-Signature=bee411598a2d57e89faf2ceb8e078eb4d57d1dedf7207eaa4f0d33a16ebf52ec&X-Amz-SignedHeaders=host&actor_id=0&response-content-disposition=attachment%3B%20filename%3Dcalicoctl&response-content-type=application%2Foctet-stream Resolving github-production-release-asset-2e65be.s3.amazonaws.com (github-production-release-asset-2e65be.s3.amazonaws.com)... 52.216.1.232 Connecting to github-production-release-asset-2e65be.s3.amazonaws.com (github-production-release-asset-2e65be.s3.amazonaws.com)|52.216.1.232|:443... connected. HTTP request sent, awaiting response... 200 OK Length: 31263616 (30M) [application/octet-stream] Saving to: ‘/usr/local/bin/calicoctl’ 100%[================================================================================================================================================================================================>] 31,263,616 1.15MB/s in 28s 2017-06-18 01:56:54 (1.07 MB/s) - ‘/usr/local/bin/calicoctl’ saved [31263616/31263616] [root@dockerhost ~]# chmod +x /usr/local/bin/calicoctl -
create a calicoctl configuration
[root@dockerhost ~]# cat /etc/calico/calicoctl.cfg apiVersion: v1 kind: calicoApiConfig metadata: spec: etcdEndpoints: http://localhost:2379 -
Install Calico as a container
[root@dockerhost ~]# calicoctl node run --node-image=quay.io/calico/node:v1.3.0 Running command to load modules: modprobe -a xt_set ip6_tables Enabling IPv4 forwarding Enabling IPv6 forwarding Increasing conntrack limit Removing old calico-node container (if running). Running the following command to start calico-node: docker run --net=host --privileged --name=calico-node -d --restart=always -e NODENAME=dockerhost -e CALICO_LIBNETWORK_ENABLED=true -e IP_AUTODETECTION_METHOD=first-found -e IP6_AUTODETECTION_METHOD=first-found -e CALICO_LIBNETWORK_IFPREFIX=cali -e ETCD_ENDPOINTS=http://localhost:2379 -e CALICO_NETWORKING_BACKEND=bird -e NO_DEFAULT_POOLS= -e CALICO_LIBNETWORK_CREATE_PROFILES=true -e CALICO_LIBNETWORK_LABEL_ENDPOINTS=false -v /var/log/calico:/var/log/calico -v /var/run/calico:/var/run/calico -v /lib/modules:/lib/modules -v /run/docker/plugins:/run/docker/plugins -v /var/run/docker.sock:/var/run/docker.sock quay.io/calico/node:v1.3.0 Image may take a short time to download if it is not available locally. Container started, checking progress logs. Skipping datastore connection test Using autodetected IPv4 address on interface eth0: 100.64.1.18/24 No AS number configured on node resource, using global value Created default IPv4 pool (192.168.0.0/16) with NAT outgoing enabled. IPIP mode: off Created default IPv6 pool (fd80:24e2:f998:72d6::/64) with NAT outgoing enabled. IPIP mode: off ▽ Using node name: dockerhost ▽ Starting libnetwork service ▽ [Unit] Calico node started successfully -
By default, docker has predefined subnet for the container and it has NAT enabled.
[root@dockerhost ~]# calicoctl get ipPool --output wide CIDR NAT IPIP 192.168.0.0/16 true false fd80:24e2:f998:72d6::/64 true false -
The reason of using Calico is to have full native IP connectivity to the container without any translation, so we need to define one.
[root@dockerhost ~]# cat ippool.yaml apiVersion: v1 kind: ipPool metadata: cidr: 100.64.100.0/24 spec: ipip: enabled: false nat-outgoing: false disabled: false [root@dockerhost ~]# calicoctl create -f ippool.yaml -
lets check the IP Pool again
[root@dockerhost ~]# calicoctl get ipPool --output wide CIDR NAT IPIP 100.64.100.0/24 false false 192.168.0.0/16 true false fd80:24e2:f998:72d6::/64 true false -
OK, now we have new subnet with NAT disabled. For now, we don’t care about IPIP mode.
-
Next step is to create virtual network to attach the container. Let’s call the virtual network name as net1.
[root@dockerhost ~]# docker network create --driver calico --ipam-driver calico-ipam net1 --subnet 100.64.100.0/24 29889d26ca1c12f842fbe819821680c4e32dd97201fa097f1877313565b0a44c -
Similar with Openstack neutron, Calico by default only allow outgoing traffic. For this experiment i want to allow everything in and out, so we need to define a new policy.
# cat policy1.yaml - apiVersion: v1 kind: profile metadata: name: net1 labels: role: net1 spec: ingress: - action: allow protocol: tcp - action: allow protocol: udp - action: allow protocol: icmp egress: - action: allow protocol: tcp - action: allow protocol: udp - action: allow protocol: icmp [root@dockerhost ~]# calicoctl apply -f policy1.yaml Successfully applied 1 'profile' resource(s) -
The policy above is kind of an ugly policy because it will applied for any container network that manage by Calico.
It is possible to create a policy based on role which can be applied to specific virtual network, but this will not be covered here.
-
Verify the policy
[root@dockerhost ~]# etcdctl get /calico/v1/policy/profile/net1/rules {"inbound_rules":[{"action":"allow","protocol":"tcp"},{"action":"allow","protocol":"udp"},{"action":"allow","protocol":"icmp"}],"outbound_rules":[{"action":"allow","protocol":"tcp"},{"action":"allow","protocol":"udp"},{"action":"allow","protocol":"icmp"}]} -
Next one is configuring BGP peering between the Docker VM and Contrail to advertise the Container IP to external network.
[root@dockerhost ~]# calicoctl config set asNumber 65000 [root@dockerhost ~]# cat bgp.yaml apiVersion: v1 kind: bgpPeer metadata: peerIP: 100.64.1.1 scope: global spec: asNumber: 64512 [root@dockerhost ~]# calicoctl create -f bgp.yaml Successfully created 1 'bgpPeer' resource(s) -
We also need to go back to Contail UI to configure BGP peering to Calico Bird daemon inside Docker VM
-
Verify the BGP peer setting
[root@dockerhost ~]# calicoctl get bgpPeer --scope=global SCOPE PEERIP NODE ASN global 100.64.1.1 64512 [root@dockerhost ~]# calicoctl node status Calico process is running. IPv4 BGP status +--------------+-----------+-------+----------+-------------+ | PEER ADDRESS | PEER TYPE | STATE | SINCE | INFO | +--------------+-----------+-------+----------+-------------+ | 100.64.1.1 | global | up | 03:09:04 | Established | +--------------+-----------+-------+----------+-------------+ IPv6 BGP status No IPv6 peers found. -
Launch a container and attach it to net1 virtual network. For this exercise, i am using centos+sshd docker image from docker hub, created by interface/centos-ssh
[root@dockerhost ~]# docker run -d --name centos-ssh --net=net1 --restart=always lnterface/centos-ssh Unable to find image 'lnterface/centos-ssh:latest' locally Trying to pull repository docker.io/lnterface/centos-ssh ... latest: Pulling from docker.io/lnterface/centos-ssh 8d30e94188e7: Pull complete fd34ea940a60: Pull complete beed134bab29: Pull complete b548acb704e4: Pull complete 7645ea6b1faf: Pull complete 814ba1117fcb: Pull complete 0452eba73bb4: Pull complete 77774789b006: Pull complete f22026c1b943: Pull complete Digest: sha256:e33d206da8cb3c267eb1f5073c8a84a3d17adf74f6d7c5a25d9db2bc751f995c 367e947d421ccc5b0d0d691e4e415f7e6cdc5bad7282ce10bafcaf2f2df07760 -
Make sure the container is running
[root@dockerhost ~]# docker ps CONTAINER ID IMAGE COMMAND CREATED STATUS PORTS NAMES 367e947d421c lnterface/centos-ssh "/usr/sbin/sshd -D" 6 seconds ago Up 3 seconds centos-ssh ...deleted... 0cc29c917a7b quay.io/calico/node:v1.3.0 "start_runit" 6 hours ago Up 6 hours calico-node -
Find the IP of the container
[root@dockerhost ~]# docker inspect centos-ssh | egrep -i "network|ip" "NetworkMode": "net1", "IpcMode": "", "NetworkSettings": { "LinkLocalIPv6Address": "", "LinkLocalIPv6PrefixLen": 0, "SecondaryIPAddresses": null, "SecondaryIPv6Addresses": null, "GlobalIPv6Address": "", "GlobalIPv6PrefixLen": 0, "IPAddress": "", "IPPrefixLen": 0, "IPv6Gateway": "", "Networks": { "IPAMConfig": null, "NetworkID": "29889d26ca1c12f842fbe819821680c4e32dd97201fa097f1877313565b0a44c", "IPAddress": "100.64.100.71", "IPPrefixLen": 32, "IPv6Gateway": "", "GlobalIPv6Address": "", "GlobalIPv6PrefixLen": 0, -
OK, the container IP is 100.64.100.71
Verification
-
Let see if we can ping the container from the test PC – WORKS!
earth:~ rendo$ ping -c 3 100.64.100.71 PING 100.64.100.71 (100.64.100.71): 56 data bytes 64 bytes from 100.64.100.71: icmp_seq=0 ttl=60 time=6.478 ms 64 bytes from 100.64.100.71: icmp_seq=1 ttl=60 time=6.396 ms 64 bytes from 100.64.100.71: icmp_seq=2 ttl=60 time=6.627 ms --- 100.64.100.71 ping statistics --- 3 packets transmitted, 3 packets received, 0.0% packet loss round-trip min/avg/max/stddev = 6.396/6.500/6.627/0.096 ms earth:~ rendo$ traceroute -n 100.64.100.71 traceroute to 100.64.100.71 (100.64.100.71), 64 hops max, 52 byte packets 1 192.168.1.1 1.499 ms 0.965 ms 0.961 ms 2 192.168.1.22 4.048 ms 1.792 ms 1.763 ms 3 100.64.0.2 2.211 ms 2.068 ms 2.535 ms 4 * * * 5 100.64.100.71 4.083 ms 3.534 ms 3.219 ms -
we can also try to ssh into the container
earth:~ rendo$ ssh root@100.64.100.71 Warning: Permanently added '100.64.100.71' (ECDSA) to the list of known hosts. root@100.64.100.71's password: [root@367e947d421c ~]# pwd /root [root@367e947d421c ~]# id uid=0(root) gid=0(root) groups=0(root) -
Let’s also ping from the container to test PC – WORKS!
[root@dockerhost ~]# docker exec -it centos-ssh /bin/bash [root@367e947d421c /]# ping -c 3 192.168.1.142 PING 192.168.1.142 (192.168.1.142) 56(84) bytes of data. 64 bytes from 192.168.1.142: icmp_seq=1 ttl=60 time=7.57 ms 64 bytes from 192.168.1.142: icmp_seq=2 ttl=60 time=202 ms 64 bytes from 192.168.1.142: icmp_seq=3 ttl=60 time=8.10 ms --- 192.168.1.142 ping statistics --- 3 packets transmitted, 3 received, 0% packet loss, time 2003ms rtt min/avg/max/mdev = 7.579/72.729/202.510/91.769 ms [root@367e947d421c /]# traceroute -n 192.168.1.142 traceroute to 192.168.1.142 (192.168.1.142), 30 hops max, 60 byte packets 1 100.64.1.18 0.188 ms 0.085 ms 0.068 ms 2 * * * 3 100.64.0.2 572.739 ms 572.406 ms 572.615 ms 4 100.64.0.1 574.424 ms 574.329 ms 574.312 ms 5 192.168.1.142 17.791 ms 17.619 ms 17.368 ms [root@367e947d421c /]# [root@dockerhost ~]# -
Let’s go deeper. Let’s check Docker VM IP configuration
[root@dockerhost ~]# ip a ...deleted.. 2: eth0: <BROADCAST,MULTICAST,UP,LOWER_UP> mtu 1500 qdisc pfifo_fast state UP qlen 1000 link/ether 02:c7:80:7e:22:f2 brd ff:ff:ff:ff:ff:ff inet 100.64.1.18/24 brd 100.64.1.255 scope global eth0 ----------------------> this is the docker VM IP, assigned by Contrail valid_lft forever preferred_lft forever inet6 fe80::c7:80ff:fe7e:22f2/64 scope link valid_lft forever preferred_lft forever 3: docker0: <NO-CARRIER,BROADCAST,MULTICAST,UP> mtu 1500 qdisc noqueue state DOWN link/ether 02:42:78:1d:6f:7e brd ff:ff:ff:ff:ff:ff inet 172.17.0.1/16 scope global docker0 ----------------------> this IP is default docker virtual network valid_lft forever preferred_lft forever inet6 fe80::42:78ff:fe1d:6f7e/64 scope link valid_lft forever preferred_lft forever 23: calid0d7ccaeef3@if22: <BROADCAST,MULTICAST,UP,LOWER_UP> mtu 1500 qdisc noqueue state UP ----------> this is the veth interface to the container link/ether 5a:04:3b:d6:c3:2b brd ff:ff:ff:ff:ff:ff link-netnsid 1 inet6 fe80::5804:3bff:fed6:c32b/64 scope link valid_lft forever preferred_lft forever -
Let’s check the Contrail side. Before starting doing that, we need to know what is the vxlan id for the contrail virtual network that Docker VM is attached to
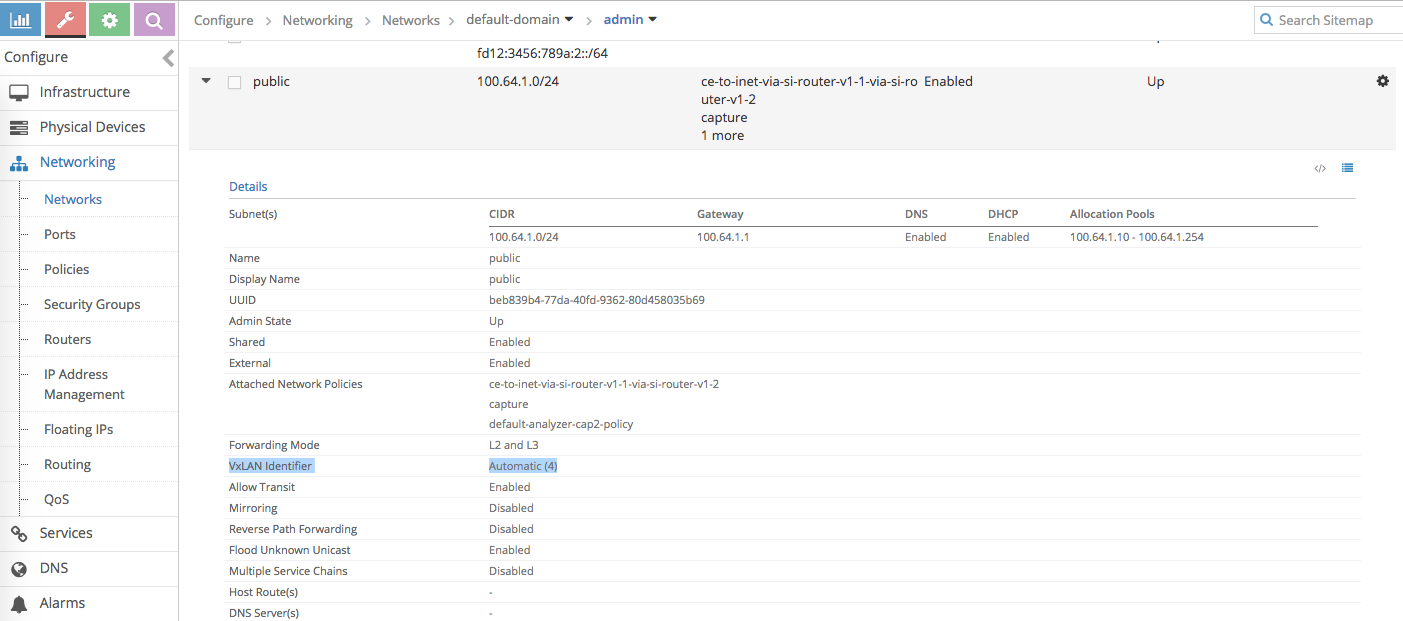
-
Let’s start with the compute node vrouter CLI
-
Find the next hop table for contrail public virtual network
root@compute01:~# vxlan --get 4 -----> 4 is the vxlan id we get from the previous step VXLAN Table VNID NextHop ---------------- 4 14 ------> next-hop table id is 14 -
Find the VRF for this virtual network
root@compute01:~# nh --get 14 Id:14 Type:Vrf_Translate Fmly: AF_INET Rid:0 Ref_cnt:2 Vrf:1 Flags:Valid, Vxlan, Unicast Flood, Vrf:1 -------> vrf id is 1 -
Dump the routing table, we specifically interested in container IP 100.64.100.71
root@compute01:~# rt --dump 1 | more Flags: L=Label Valid, P=Proxy ARP, T=Trap ARP, F=Flood ARP vRouter inet4 routing table 0/1/unicast Destination PPL Flags Label Nexthop Stitched MAC(Index) ..deleted.. 100.64.1.18/32 32 P - 90 2:c7:80:7e:22:f2(231688) ---> to go to docker VM use next-hop ID 90 ..deleted.. 100.64.100.71/32 26 - 90 - -------> to go to container IP, we should look up next-hop id 90- The above result tell us that both to go to docker VM and container inside docker VM, the next hop is the same.
-
Check where is the next-hop id 90 bring us
root@compute01:~# nh --get 90 Id:90 Type:Encap Fmly: AF_INET Rid:0 Ref_cnt:263 Vrf:1 -------> nh id 90 is going to locally attached VM interface with id 37 Flags:Valid, Policy, EncapFmly:0806 Oif:37 Len:14 Encap Data: 02 c7 80 7e 22 f2 00 00 5e 00 01 00 08 00 -
Find the tap interface that connect to docker VM. This is useful if we want to sniff the traffic to Docker VM
  root@compute01:~# vif --get 37
  Vrouter Interface Table

  Flags: P=Policy, X=Cross Connect, S=Service Chain, Mr=Receive Mirror
      Mt=Transmit Mirror, Tc=Transmit Checksum Offload, L3=Layer 3, L2=Layer 2
      D=DHCP, Vp=Vhost Physical, Pr=Promiscuous, Vnt=Native Vlan Tagged
      Mnp=No MAC Proxy, Dpdk=DPDK PMD Interface, Rfl=Receive Filtering Offload, Mon=Interface is Monitored
      Uuf=Unknown Unicast Flood, Vof=VLAN insert/strip offload, Df=Drop New Flows, Proxy=MAC Requests Proxied Always

  vif0/37     OS: tapc7807e22-f2
              Type:Virtual HWaddr:00:00:5e:00:01:00 IPaddr:0
              Vrf:1 Flags:PL3L2DUuf MTU:9160 QOS:-1 Ref:5
              RX packets:210872  bytes:15967444 errors:0
              TX packets:328042  bytes:568026520 errors:0
              Drops:43
-
-
We also want to check if the container IP is advertised to gateway router
rw@gw-01> show route 100.64.100.71 inet.0: 12 destinations, 13 routes (12 active, 0 holddown, 0 hidden) + = Active Route, - = Last Active, * = Both 100.64.100.0/24 *[Static/5] 08:27:04 > to 100.64.0.2 via lt-0/0/10.10 contrail-public.inet.0: 9 destinations, 9 routes (9 active, 0 holddown, 0 hidden) + = Active Route, - = Last Active, * = Both 100.64.100.64/26 *[BGP/170] 05:55:18, localpref 100, from 192.168.1.19 AS path: 65000 I, validation-state: unverified > via gr-0/0/10.32769, Push 35 rw@gw-01> show dynamic-tunnels database Table: inet.3 Destination-network: 192.168.1.0/24 Tunnel to: 192.168.1.18/32 State: Up Reference count: 4 Next-hop type: gre Source address: 192.168.1.22 Next hop: gr-0/0/10.32769 State: Up- Calico Bird agent in Docker VM advertise the container IP as an aggregated subnet 100.64.100.64/26 to Contrail control node and Contrail control forward it gateway router
- 100.64.100.64/26 is advertised by 192.168.1.19 which is Contrail control node
- the next hop for this route is GRE tunnel gr-0/0/10.32769 is to the Compute node vrouter IP 192.168.1.22
-
Alternatively, we can also check from the Contrail UI
-
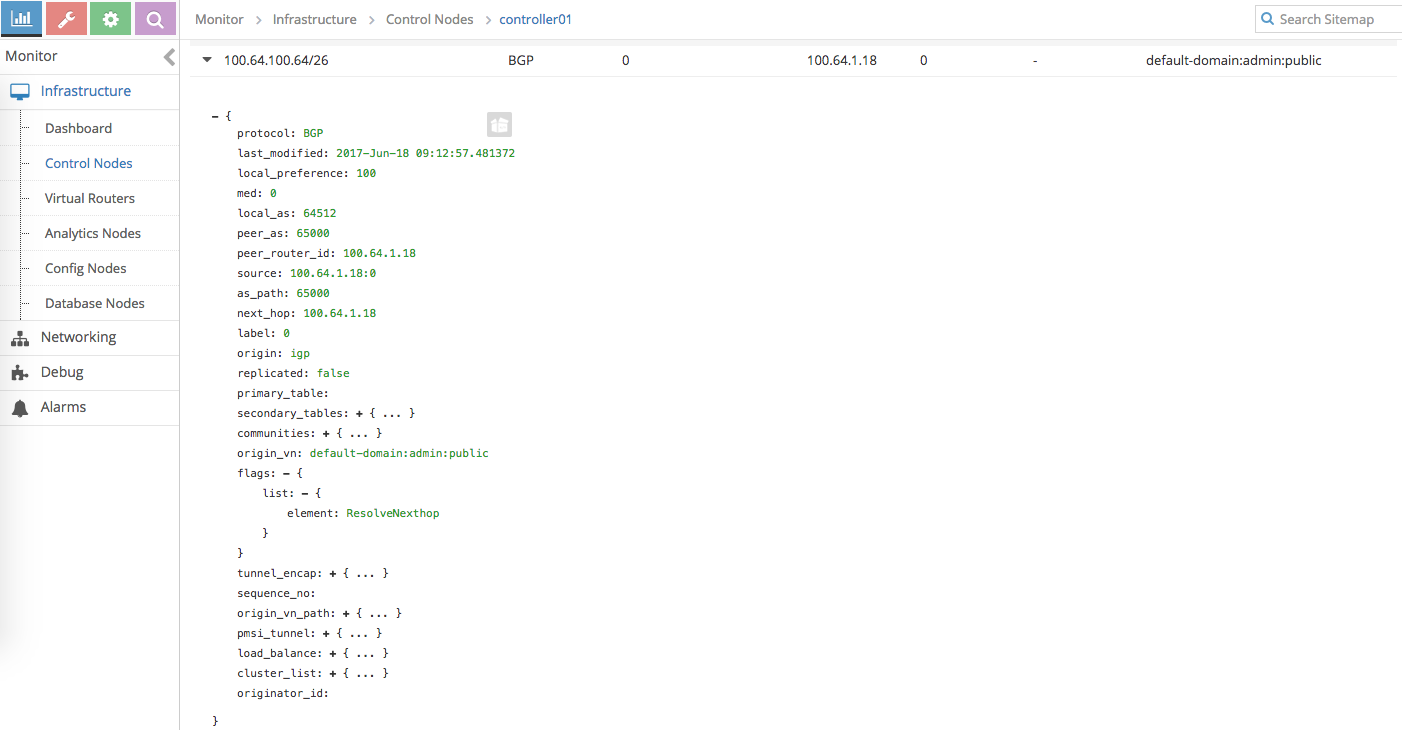
Check route to the container IP from Contrail control node
-
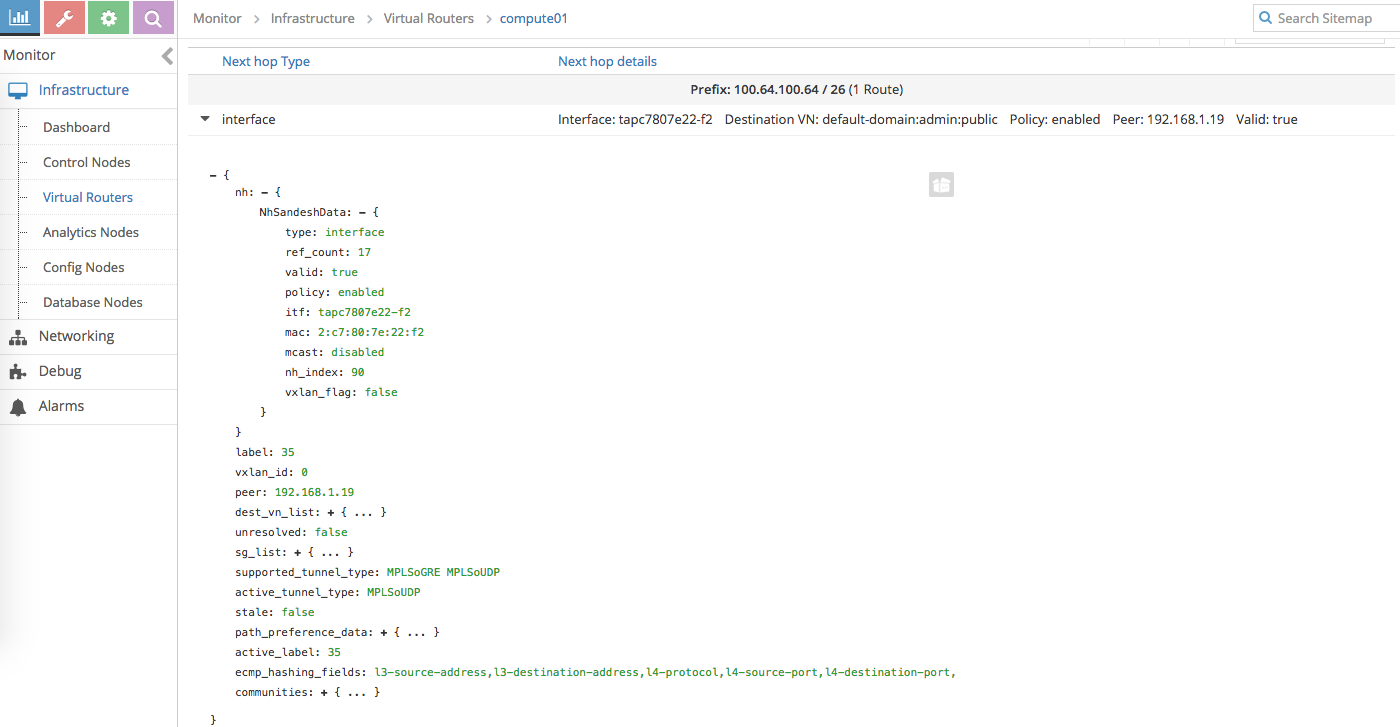
Check route to the container IP from Contrail vrouter
-
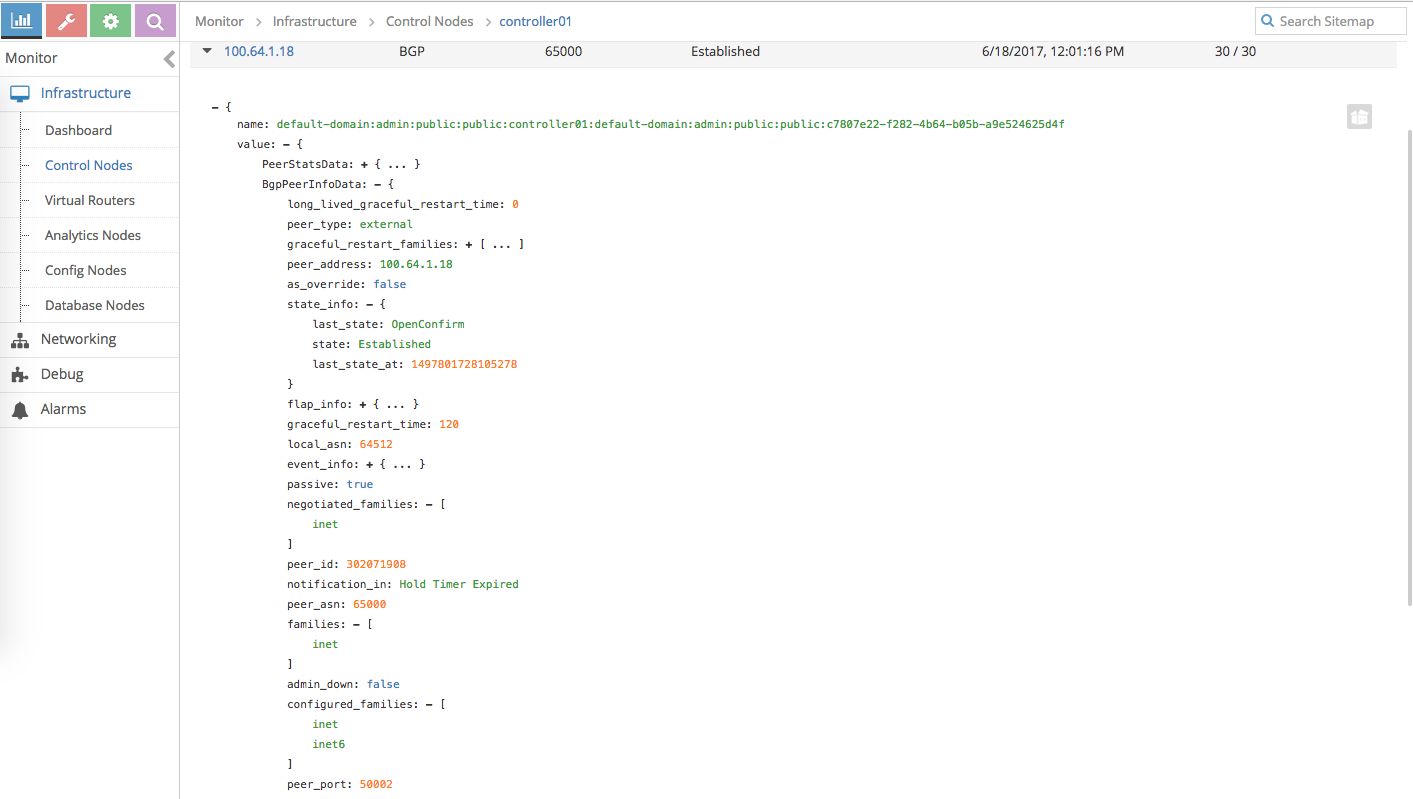
Check BGP peering status to Calico
-
Summary
This exercise basically show one of the BGP as a Service use case and also shows the integration between Contrail as Openstack Neutron plugin and Calico as Docker/Container networking plugin.
… OK, that’s it for now.